Blog > How to Import Credit Card Transactions into NetSuite
How to Import Credit Card Transactions into NetSuite
If you’re a merchant, accountant, or NetSuite admin, you already know that manually tracking credit card purchases can get messy fast. Expenses fall through the cracks, reconciliations take longer, and month-end closing becomes a painful scramble. That’s where learning how to import credit card transactions into NetSuite comes in—it gives you structure, consistency, and a better view of where your money is going.
NetSuite is powerful accounting and enterprise resource planning (ERP) software, but getting your credit card data into it isn’t always plug-and-play. This article will walk you through the key steps of importing credit card transactions into NetSuite and how to prepare.
Whether managing business expenses across departments or trying to clean up your reconciliation process, having a proper NetSuite integration for credit card transactions is a game-changer.
Understanding Your Source Data
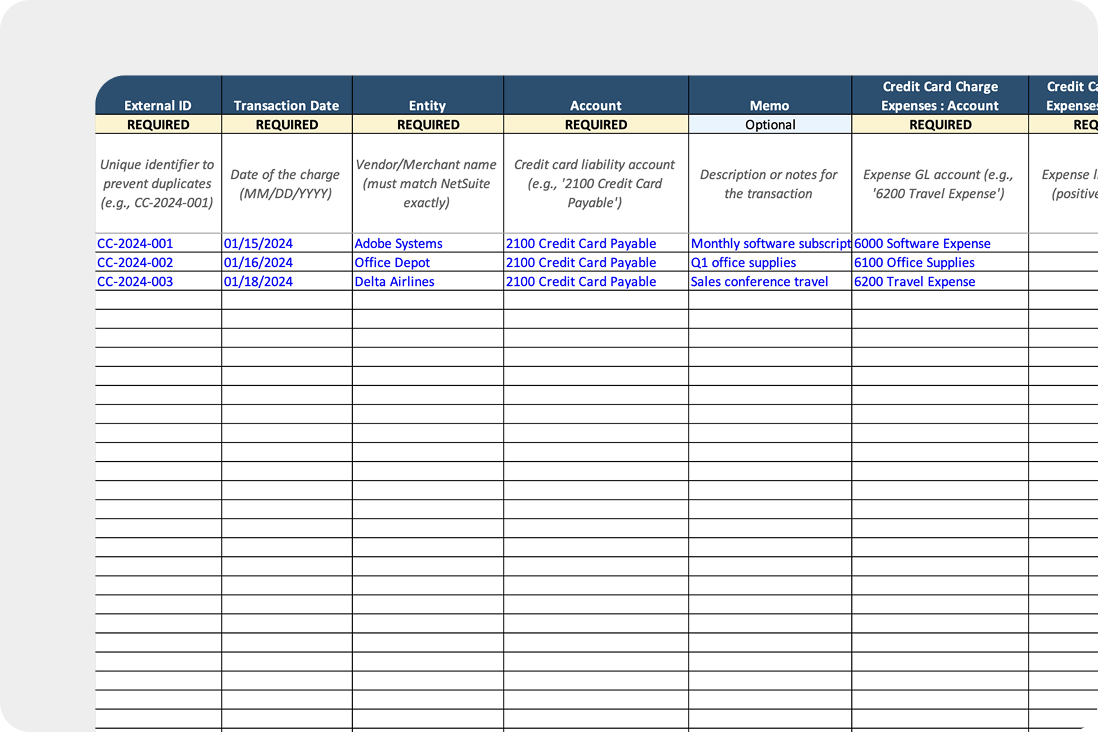
Before you can do anything in NetSuite, you need to understand where your credit card data is coming from. This usually means downloading a comma separated value (CSV) or Excel file from your bank or payment processor. Some merchants may use third-party tools that export transactions into structured formats.
You’ll want to check that your file includes the basics:
- Transaction date
- Vendor or merchant name
- Amount charged
- Memo or description field
- Category or account type (if available)
The more structured your source data is, the smoother the process. If the file has a consistent layout, you’ll avoid most formatting headaches when importing.
Preparing NetSuite for Import
NetSuite doesn’t just accept credit card data out of the box—you’ll need to make sure your setup can handle it. Start by confirming that your chart of accounts includes a credit card account. If not, you’ll need to create one.
It also helps ensure that vendor records already exist for merchants you frequently do business with. This makes it easier to match imported transactions later. Some users also create categories or departments in advance, so transactions can be classified accurately during import.
This setup is foundational to using NetSuite billing software effectively and ensuring a clean match between your source data and your general ledger.
How to Set Up a Credit Card Account in NetSuite
Before you can import or record any credit card transactions, you need a credit card account in your chart of accounts. Here’s how to create one:
Go to Setup > Accounting > Chart of Accounts and click “New.” Select “Credit Card” as the account type. Give it a descriptive name that identifies the card, like “Amex Corporate Card” or “Visa Business Card.” Assign the appropriate currency if you’re running a multi-currency environment, and set the account number to match your internal naming conventions.
Once the account is created, it will appear as an option when you record credit card charges or run imports through the Import Assistant. If you have multiple cards across departments or team members, consider creating separate accounts for each one. This makes it easier to reconcile individual statements and track spending by card rather than lumping everything together.
Import Methods
Once your credit card data is clean and NetSuite is ready to receive it, it’s time to actually move the transactions into the system. This step can feel a little technical at first, but with the right method, it doesn’t have to be complicated. How you import will depend on your volume of transactions and how hands-on you want the process to be.
There are two main ways to go about it:
1. Manual CSV Upload Using NetSuite’s Import Assistant
If you’re doing this yourself, NetSuite’s Import Assistant can walk you through the process. Here’s how it typically goes:
- Clean your CSV file (dates, amounts, and field names should be clear and consistent)
- Go to Setup > Import/Export > Import CSV Records
- Choose the appropriate record type (typically “Credit Card Transaction”)
- Upload your file and map your fields to NetSuite fields
- Run the import and review any errors
This approach works well for smaller volumes or one-off imports. It’s a little tedious, but it gets the job done.
2. Using a Third-Party Integration Tool
If you’re looking to automate the process, third-party tools like EBizCharge are a better fit. These platforms handle the heavy lifting and are built to streamline NetSuite credit card processing.
With an integrated solution, your credit card transactions sync in real time or on a schedule. Fields are mapped automatically, and errors are reduced. It’s a great option if you want your NetSuite payment processing to be hands-off and consistent.
Uploading Credit Card Statements to NetSuite
If you want to upload a full credit card statement rather than importing transactions one by one, the process is similar but starts with your bank or card provider’s export.
Most major card providers, including American Express, Chase, and Capital One, let you download monthly statements as CSV or OFX files. Once you have the file, clean up any extra header rows or summary lines that your bank includes, since NetSuite’s Import Assistant expects clean row-by-row transaction data.
From there, follow the same CSV import process: go to Setup > Import/Export > Import CSV Records, select the credit card transaction record type, upload your file, and map the fields. The main difference with a full statement upload is volume. You’ll want to double-check for duplicate entries if you’ve already imported some transactions from that period individually.
Some users also leverage NetSuite’s bank import features or SuiteApps that connect directly to banking feeds, pulling statement data automatically without manual downloads. If your transaction volume justifies it, this is worth exploring as a more hands-off approach.
Importing Transactions from Stripe, Square, and Other Processors
If your business uses a third-party payment processor like Stripe or Square, the import process depends on how that processor connects to NetSuite.
Some processors offer native NetSuite integrations or SuiteApps that sync transaction data automatically. In those cases, credit card charges, fees, and payouts map directly to your chart of accounts without manual CSV work. If a native integration isn’t available, most processors let you export transaction history as a CSV, which you can then import using the same Import Assistant workflow.
The key thing to watch for with processor imports is how fees and net payouts are handled. A single customer payment might include the gross amount, a processing fee, and a net deposit. Make sure your import maps all three so your bank reconciliation matches what actually hits your account. If you’re importing historical data from a processor you’ve recently connected, run a test batch first to confirm field mapping before uploading months of transactions at once.
Validating and Matching Transactions
Once the data is in, your job isn’t quite finished. The next step is validation. That means checking for accuracy, making sure amounts match, and confirming that transactions have landed in the right place.
If you have vendor bills in NetSuite, now’s the time to apply the imported credit card charges to them. This is especially helpful for businesses that manage a lot of supplier payments.
Reconciling your credit card statements becomes much easier when you’ve followed a consistent import process. You can compare transactions side by side, flag discrepancies, and close the books faster.
How to Apply Credit Card Charges to Vendor Bills in NetSuite
One of the most common workflows after importing credit card transactions is applying those charges to existing vendor bills. This is how you close the loop between what you’ve been billed and what you’ve already paid.
In NetSuite, you do this by opening the credit card charge record and linking it to the corresponding vendor bill. Navigate to the credit card transaction, select the vendor, and use the “Apply” subtab to match it against open bills for that vendor. When the amounts align, NetSuite marks the bill as paid and updates your accounts payable balance.
If you’re dealing with partial payments or charges that cover multiple bills, you can split the application across several records. Just make sure the total applied matches the credit card charge amount. For businesses that pay vendors by credit card regularly, building this step into your weekly reconciliation routine keeps your AP and credit card accounts in sync and prevents surprises at month-end.
Common Errors and Troubleshooting
If you’re figuring out how to import credit card transactions into NetSuite for the first time, it’s not uncommon to run into a few hiccups. Here are some common ones to look out for:
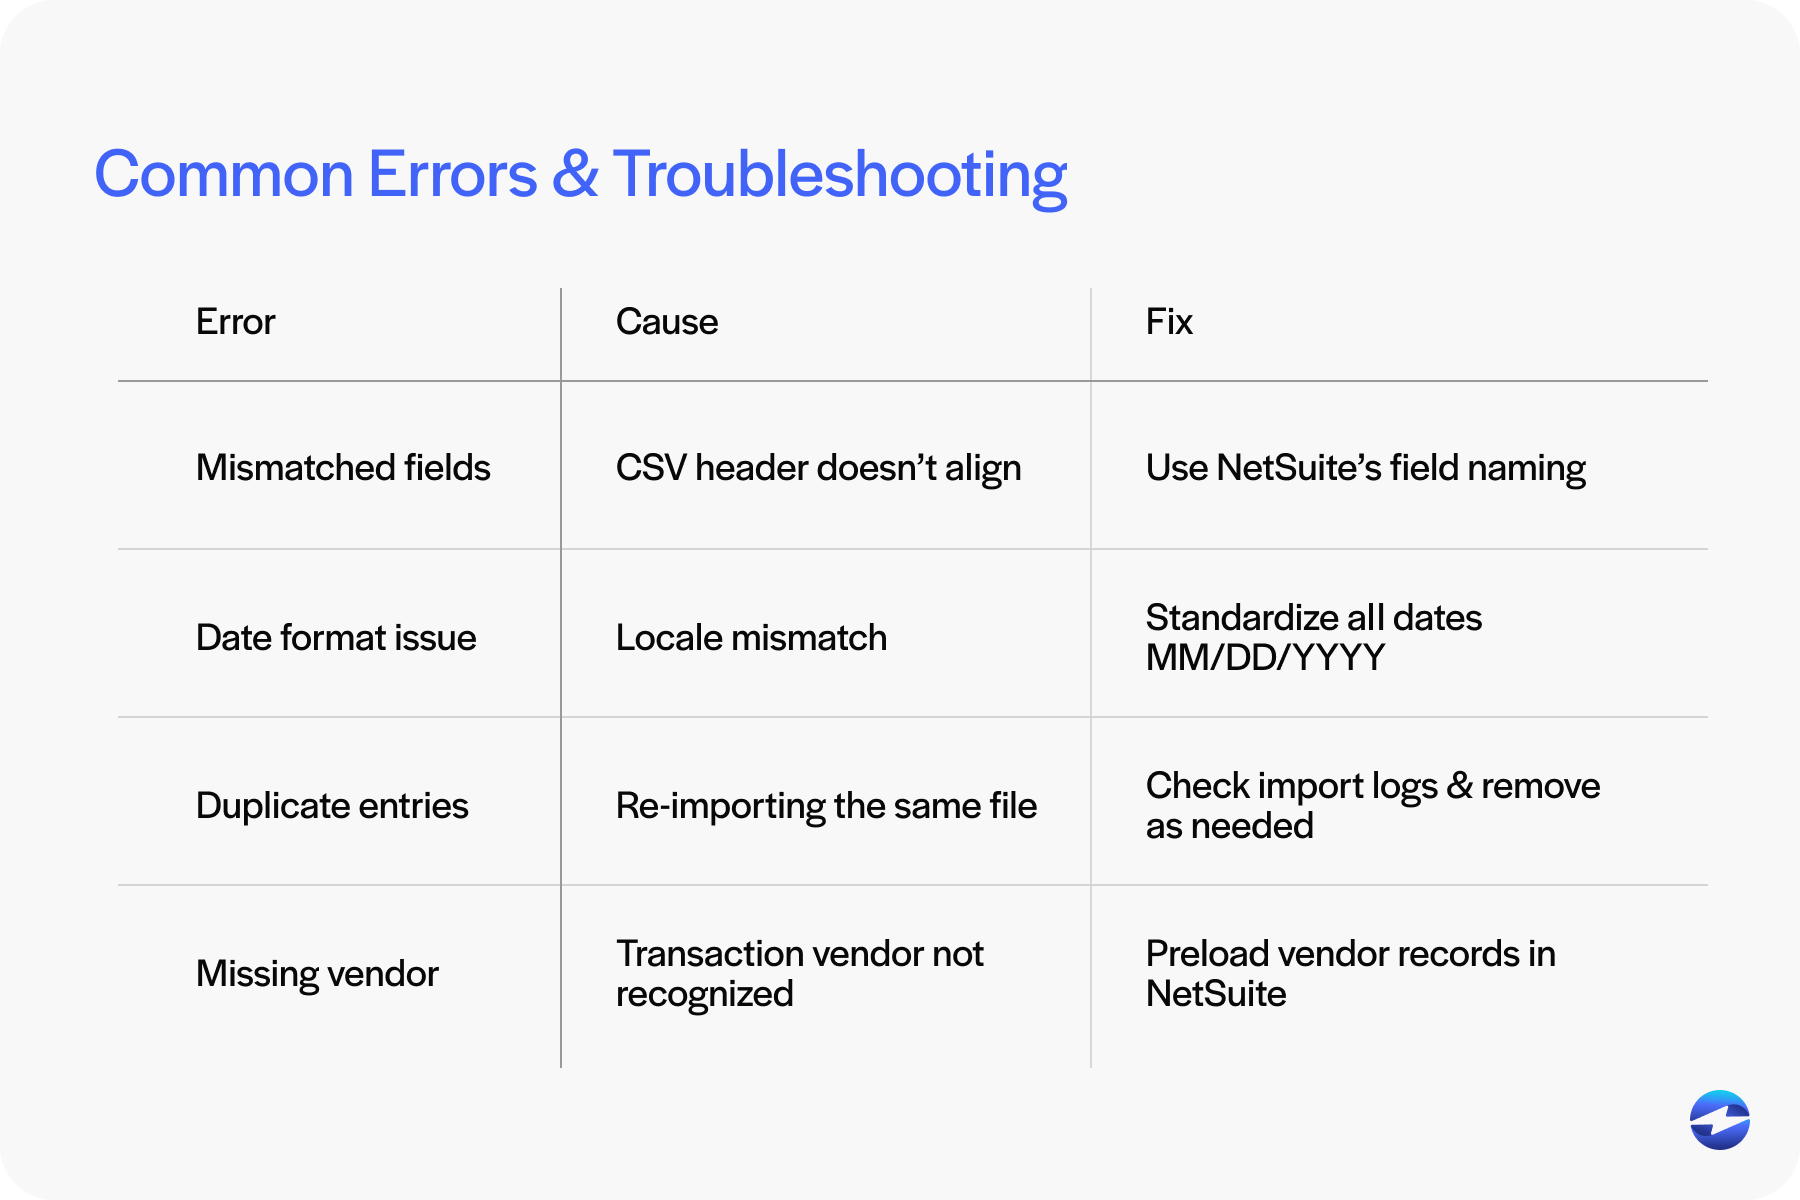
- Mismatched fields: Mapping will fail if your CSV headers don’t match NetSuite’s field names.
- Date format issues: U.S. vs. international formatting can break your import.
- Duplicate entries: Easy to miss when you’re importing manually—double-check before you upload.
If something goes wrong, don’t panic. NetSuite lets you roll back imports. Just document your process, so you know what to fix.
Best Practices for Ongoing Maintenance
Importing your credit card transactions correctly is a great first step. But over time, consistency and good habits are what really keep things running smoothly. When importing manually or using a NetSuite integration, it’s worth building a maintenance routine that prevents issues before they start.
Here are a few best practices to help you stay on top of things:
Set a regular import schedule: Choose a frequency – weekly, bi-weekly, or monthly – based on how often your transactions come in.
Reconcile often: Don’t wait until month-end. Spot and fix mismatches early to save time later.
Document your process: Keep track of how you import, what tools you use, and who’s responsible. It helps with consistency and training.
Use automation where possible: If your payment processing solution offers syncing, take advantage of it. Let your NetSuite payment solution do the heavy lifting.
Review permissions: Make sure only trusted team members have access to sensitive financial data and import tools.
Check for errors: Regularly review error logs or failed imports to catch recurring issues.
The goal is to make your import process repeatable, low-maintenance, and resilient. With reliable routines in place, your NetSuite credit card processing becomes easier to manage and far less prone to surprises.
EBizCharge and Credit Card Transaction Integration
If you’re looking for a simpler way to manage all of this, EBizCharge offers a powerful NetSuite integration specifically built for credit card processing. It automates the import of transactions, keeps data synced in real time, and reduces manual reconciliation work.

Unlike generic tools, EBizCharge is tailored to NetSuite payment processing workflows. It connects directly to your payment processor, eliminates the need for CSVs, and supports auto-categorization. This not only saves time but also minimizes errors.
Merchants using EBizCharge often find that their overall NetSuite credit card processing becomes faster, more reliable, and easier to audit. That’s especially helpful when scaling or dealing with higher transaction volumes.
Whether you’re going the manual route or choosing a more automated NetSuite integration, key is consistency. When you’re ready to make things easier, choosing a payment processing solution like EBizCharge can go a long way toward improving your NetSuite billing software experience.
Frequently Asked Questions
How do I import credit card transactions into NetSuite?
Use NetSuite’s Import Assistant under Setup > Import/Export > Import CSV Records. Select the credit card transaction record type, upload your cleaned CSV file, map the fields, and run the import. For automated imports, a third-party integration like EBizCharge can sync transactions directly without CSV files.
How do I apply a credit card charge to a vendor bill in NetSuite?
Open the credit card charge record, select the vendor, and use the Apply subtab to match it against open vendor bills. When the amounts match, NetSuite marks the bill as paid and updates your accounts payable balance.
How do I create a credit card account in NetSuite?
Go to Setup > Accounting > Chart of Accounts, click New, and select “Credit Card” as the account type. Name it to match the specific card (e.g., “Amex Corporate Card”) and assign the appropriate currency if needed.
Can I upload a full credit card statement to NetSuite?
Yes. Download your statement as a CSV from your bank or card provider, clean up any extra header rows, and import using the Import Assistant. You can also use banking feed SuiteApps to pull statement data automatically.
How do I import Stripe or Square transactions into NetSuite?
Check if a native integration or SuiteApp is available for your processor. If so, transactions can sync automatically. If not, export transaction history as a CSV and import manually. Pay attention to how fees and net payouts are mapped to ensure accurate reconciliation.
What are common errors when importing credit card transactions into NetSuite?
The most frequent issues are mismatched field headers, date format conflicts (US vs. international), and duplicate entries from overlapping import periods. NetSuite allows you to roll back imports if something goes wrong.
Can I automate credit card transaction imports in NetSuite?
Yes. Integration tools like EBizCharge connect directly to your payment processor and sync transactions to NetSuite automatically, eliminating the need for CSV downloads and manual uploads.
- Understanding Your Source Data
- Preparing NetSuite for Import
- How to Set Up a Credit Card Account in NetSuite
- Import Methods
- Uploading Credit Card Statements to NetSuite
- How to Apply Credit Card Charges to Vendor Bills in NetSuite
- Common Errors and Troubleshooting
- Best Practices for Ongoing Maintenance
- EBizCharge and Credit Card Transaction Integration
- Frequently Asked Questions

